Build a complete CI/CD Pipeline and its infrastructure with AWS — Jenkins — Bitbucket — Docker — Terraform → Part 3

In this third part of our tutorial we are going to set up the AWS infrastructure using Terraform. We are going to create all the necessary elements to secure our instances while making them able to communicate with the external world.
Part 1 (here)→ Set up the project by downloading and looking at the Web App which will be used to test our infrastructure and pipeline. Here we also create & test suitable Dockerfiles for our project and upload everything to Bitbucket.
Part 2 (here)→ Set up Slack and create a Bot which will be used by Jenkins to send notifications on the progression/status of the pipeline.
Part 3 (current article) → Create the first part of the AWS Infrastructure with Terraform. Here we will create the EC2 instances / SSH keys and the actual Network infrastructure plus the basis for the IAM roles.
Part 4 (here)→ Create the second part of the AWS Infrastructure with Terraform. We are going to create the S3 buckets, the ECR repositories and complete the definition of the IAM roles by adding the correct policies.
Part 5 (here)→ Complete the configuration of the Jenkins and Web App instances by implementing the correct user data.
Part 6 (here)→ Implement the Pipeline in a Jenkinsfile and try out the pipeline, see how eveything fit together and lay down some final comments.

Create new IAM User
If you do not have an AWS account, you can create one at:
and then sign-in to the console. At this point we should be logged in as root and for security reasons it is better to create a new user with administrator power and not using the root account. In the console’s search bar, look for IAM:

Then go to User :

Select Add User :

And then we can name it Admin and give both Programmatic Access (so that it will be able to use the AWS CLI) and AWS Management Console Access (so that we will be able to log in the console with that user). Let’s give it a custom password and unselect the Require password reset :

After clicking Next button, select Attach existing policies directly and click on the Administrator Access :

After clicking Next we can skip assigning tags and click Next again. At this point we are in the Review page and after checking that everything is fine, we can click Create User .
Here we can see that AWS provides us with an Access key ID and a Secret Access key with the possibility to download the credentials in .csv format. Let’s do that! The important thing to remember is that the Secret Access key will never (and let me say that again: Never) be available to you to see again!

Taking a look at the .csv we just downloaded, we can see that we have the keys plus a Console login link . Let’s grab that and after loggin out from the AWS console, let’s log back in using that URL. This URL will automatically fill for you the ACCOUNT ID field in the login form.
Alright, now that we have an AWS User with admin privileges, we can start messing around with Terraform.
Terraform Setup
In order to install terraform just navigate to:
Depending on the operating system you’re on, you can download the right binary.
For Windows, you can download the 64-bit or 32-bit, unzip it and then copy and paste the executable into the C:\Windows\system32 folder so that it will be immediately available in the PATH (or you can unzip wherever you want and add that path to the environment variables).
You can check that terraform is available to you on the console by (you need to close and reopen the shell to have terraform available in the environment variables):

Terraform Project
In ordet to start working with terraform, in our simple-web-app folder, let’s create a new Terraform folder and enter it:
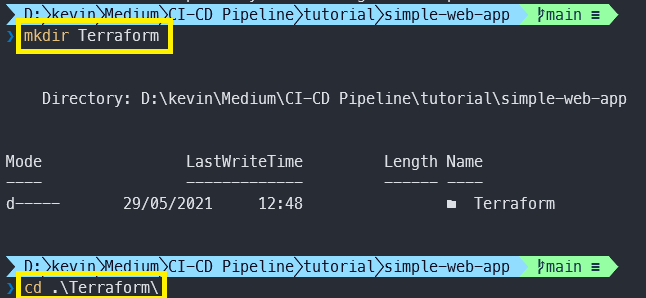
Once we are inside simple-web-app/Terraform we can open the folder with VSCode and start creating our infrastracture.

Terraform — First Steps
Let’s first create the standard initial files which are needed for a terraform project:

variables.tf→ This file will contain the definition of the variables that will be used in the project;terraform.tfvars→ Will set the variables defined invaraibles.tf. These will be sensitive data like the AWS credentials, passwords, SSH keys, etc.. So it is important to *NOT COMMIT* this file (later we will modify the.gitignore);providers.tf→ Will tell Terraform which cloud provider we would like to interact with;output.tf→ We can specify here some fields that we would like to have as output (like the Jenkins URL, the ECR repository URLS, etc… ), these are in general created by AWS and we can tell Terraform to output them for us.
Nice, let’s start by first telling Terraform the provider (in providers.tf ) :
Here we are assigning the access_key , secret_key and region to some variables var. which we need to define in the variables.tf and then assign in the terraform.tfvars . Let’s start with their definition in variables.tf :
Now, open up terraform.tfvars and put the following code:
Where in the aws-access-key and aws-secret-key you need to put the actual keys from the .csv file that you downloaded before from AWS.
At this point, we can initialize Terraform with:
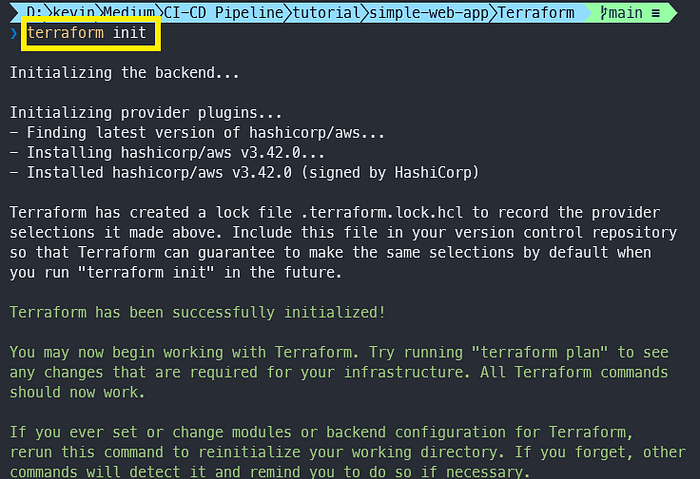
As you can see, this command will produce a .terraform folder and a .terraform.lock.hcl . We will later add these too to the .gitignore !
Terraform —Jenkins and App Server
Let’s create our Terraform modules for the Jenkins and the App server. Create two folders:
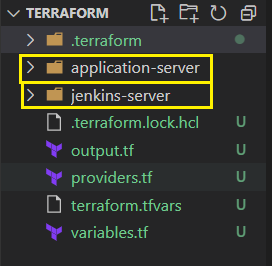
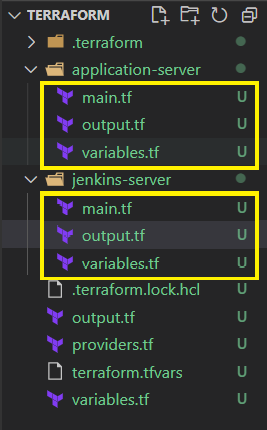
Inside each one of these, we are going to put three files:
main.tf→ Will contain the ‘resource’ definition;variables.tf→ Will contain the variables which can be set when creating an instance of that module;output.tf→Will contain the variables that we would like to have access to out from the creation of that resource.
Terraform — App Server
In the application-server/variables.tf let’s define the fields that are needed to define an EC2 instance, considering also that we are going to need the ECR ‘production’ repository URL to pull the image from:
ami-id→ The AMI (Amazon Machine Images) id is an identification ID for different instances. We are going to use theAmazon Linux 264-bit in theus-east-1region. Keep in mind that the AMI depends also on the region!iam-instance-profile→ The IAM profile is a container for the IAM role which we are going to create afterwards.instance-type→ The type of our instance, these defines how ‘powerful’ your instance will be (with different costs associated). We are defaulting tot2.microwhich is Free Tier Eligible, so we will not incur in fees for its first 750 hours of usage.name→ Name we would like to assign to our instance.key-pair→ This will be the name of a key-pair AWS resource which will store SSH keys and will indeed allow us to SSH into the machine.network-interface-idanddevice-index→ This are needed to assign a network interface to our instance.repository-url→ ECR ‘production’ repository URL which is needed to pull the Web App image from.
Now, in the application-server/main.tf we can define our resource:
Here we assign each part of the resource to the corresponding variable and then we define the user_data by employing the Terraform function templatefile . This function will grab the content of the file specified with the path ${path.module}/user_data.sh (i.e. [...]/Terraform/application-server/user_data.sh ) and will substitute each occurence of repository_url with the content of var.repository_url (in the user_data.sh , the variable repository_url will be actually used as ${repository_url} ). More on the Terraform templatefile function can be found here .
Let’s then create the user_data.sh file:

And for now, we can just put there:
Finally, in the application-server/output.tf we just can output the following elements:
Terraform — Jenkins Server
Alright, let’s now implement the Jenkins server module. Let’s first fill the jenkins-server/variables.tf which will contain the same variables as the application-server but with the addition of some more. However, at this point, we will omit those and we’ll add them when we will actually need them. At this point let’s write:
In the jenkins-server/main.tf , for now, we are going to write the following:
Here in the user_data we are putting directly some code. Later on (in the Fourth part of this tutorial) we are actually going to implement the 16k Characters limit workaround I’ve explained in this article (plus some other stuff).
Finally, in the jenkins-server/output.tf we will output the same elements as for the application sever:
Terraform — Networking
It’s time to implement our ‘Network’. This will be nothing too complicated since we will have only two instances, however we will define all the elements which will allow for an easy scaling. Let’s pin point the elements we are going to define:
- VPC
- Gateway
- Route Table
- Subnets → One for the Jenkins instance and one for the Web App
- Route Table Association → To associate a subnet with the Route Table
- Security Groups → To allow inbound/outbound traffic from and to different ports
- Network Interfaces
- Elastic ip addresses
In order to implement all these resources, let’s define a Terraform/networking.tf file:
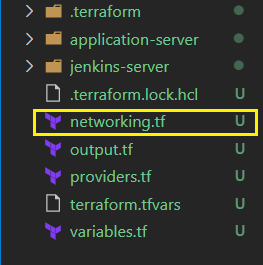
And start by adding all the above steps as comments to that file (so that we will have a track to follow):
Beautiful! We are now ready to start implementing all these resources.
VPC
This VPC will have available the IP addresses with the first 16 bits fixed at 10.0 and the second 16 bits free. We also enable DNS hostnames, so we will be able to reference instances via DNS.
GATEWAY
Our Internet gateway should be inside the VPC created above and will allow our instances to communicate to the outside world.
ROUTE TABLE
Route tables allows our subnets to access the internet through the internet gateway. In the route object we specify the destination as the cidr_block (so we allow every destination with “0.0.0.0/0”) and we specify the target as our previously defined gateway .
SUBNETS
— Jenkins —
The Jenkins subnet will have addresses starting with 10.0.1 with the last 8 bits free. We also set the availability_zone to us-east-1a (for more info check here ). We specify the availability zones for both the jenkins’ subnet and the Web App’s subnet since the Jenkins one needs to have access to the Web App EC2 instance to reboot it. If they were in different availability zones, this could not be possible.
— Simple Web App —
The Web App subnet will instead have the first 24 bits fixed at 10.0.3 .
ROUTE TABLE ASSOCIATION
— Jenkins —
We associate the Jenkins subnet with the route table to allow outgoing traffic.
— Web App —
SECURITY GROUPS
— Allow inbound HTTP and HTTPS traffic —
This security group will allow instances to receive HTTP and HTTPS traffic. HTTP clearly on port 80 and HTTPS on port 443 from everywhere (‘0.0.0.0/0’).
— Allow inbound SSH —
— Allow inbound Jenkins traffic —
Since Jenkins by default listens on port 8080, we need to open that port to be able to interact with it.
— Allow inbound traffic for security checks —
Since we need to make requests with Arachni for some basic security checks, we need to open the port 8000 which is the port on which the Web App will listen inside the Docker Container (we will map that port inside the container to its corresponding port outside). This is not optimal and it is another weakness point of this construction. Best would be to have a dedicated EC2 instance (as it has been mentioned at the begginning of part 1, best would be to have a complete infrastructure mimicking the production one) for staging tests (it wouldn’t be hard to implement that, one could have a stopped instance which is started by jenkins and which at boot time grab the staging image and then jenkins (arachni) could make HTTP request to that instance to test the environment. At the end, the instance could be stopped to not incur in unneeded expenses).
— Allow outbound traffic —
As we may notice, this has egress instead of ingress and will allow outbound traffic to everything.
NETWORK INTERFACE
— Jenkins —
At this point we create the network interface which will handle the traffic to and from our Jenkins instance. As we can see we have added some of the security groups we defined above, in particulare we allow all outbound traffic, ssh traffic, traffic on port 8080 (jenkins) and traffic on port 8000 (for security checks). We also se its private id to be 10.0.1.50 .
— Web App —
Here we allow our Web App EC2 instance to communicate through HTTP, HTTPS and SSH. We also set it’s IP to 10.0.3.50 .
ELASTIC IP
— Jenkins —
Define the Jenkins Elastic IP, associating it to the private IP 10.0.1.50 (Jenkins’ one) and the Jenkins’ network interface. We also specify that it depends on the internet gateway (as the terraform page says, the elastic ip may require the internet gateway to already exist).
— Web App —
Perfect, every resource for a correct network has been defined. What we need now is to define the IAM profiles/roles/policies which will be used by the EC2 instances to access AWS resources. We will provide Strict Rules to our instances, these will be able to access only the resources that they need to access!
How are those structured?
- Instance profile → container for IAM role;
- Role → ‘Identity’ that will have specific permissions specified by the policies;
- Policies → Permissions granted to the IAM profile to access resources in the AWS account.
Let’s create a iam.tf file in the root Terraform directory:

Inside iam.tf we are going to define the profiles and roles for the Jenkins and the Web App EC2 instances. Later on we will add the policies needed to access the required resources.
Let’s then add the following code inside that file:
For the jenkins instance we will do the same:
Sanity Check
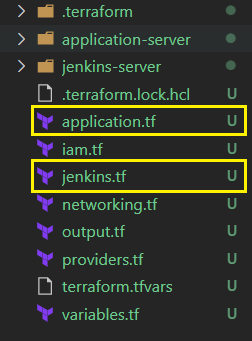
This is a good time to make a sanity checks, namely see whether everything ‘works’ fine. In order to do that, we need to actually use the modules we created for the Jenkins and the Web App instances. Let’s create two more files: application.tf and jenkins.tf placed in the root Terraform directory.
In the application.tf let’s implement the following:
Where we assign all the variables that we have previously define in application-server/variables.tf . We also make a reference to a aws_key_pair.simple-web-app-key resource which we still need to create, we’ll do that after the implementation of jenkins.tf . Also, we define the repository-url with a placeholder, since we do not have created the ECR yet.
In the jenkins.tf, let’s put the following code:
And here we instead reference a aws_key_pair.jenkins-key .
These key-pair resources will store the public key thanks to which we will be able to access the instance via SSH. Let’s then first create the keys and then create the AWS resources.
SSH KEYS
Hop over to the terminal and:

This command will prompt for a passphrase, just leave that empty and confirm. We will now have a public and a private RSA key in our Terraform folder. Let’s rename these to:

We’ll now to the same for the Jenkins key:
ssh-keygen -t rsa -b 4096 -f jenkinsmv .\jenkins .\jenkins.keymv .\jenkins.pub .\jenkins.pem
Cool, we can now implement the key-pair resources. Let’s create a key-pairs.tf :
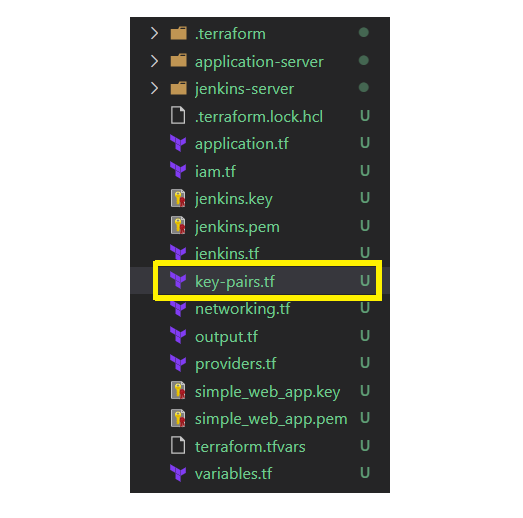
And put in there the following:
Alright, now we can try out our infrastructure so far. Let’s:

And then:

This last command will output every resource that Terraform will create. At the beginning there is a table with the definition of the symbols used in that output. At this point we can type ‘yes’ to let Terraform create all these resources for us. If everything went fine, we should see something like:

We do not have any output from Terraform, since we did not write anything in the Terraform/output.tf file.
Let’s login to the AWS console and go to the EC2 service:

On the left, click on Instances :
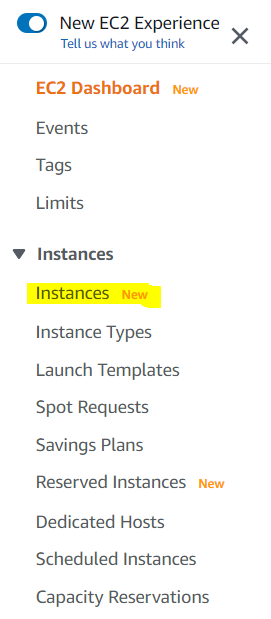
and there, we should see our two instances:

Select the Jenkins one and on the top bar select Connect :

In the SSH client panel, copy the example string with the command to connect to the instance via SSH:
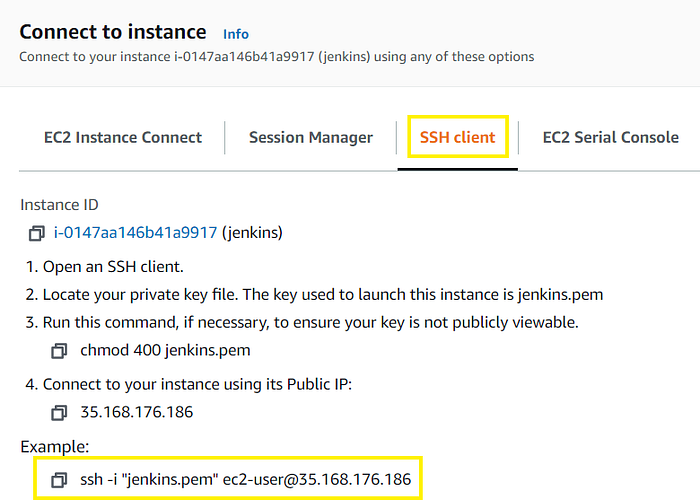
Let’s paste that command in the shell but substituting the .pem with .key since our private key is jenkins.key . For Linux users, they need to change the permissions of that key with chmod 400 jenkins.key to then be able to use that key.

Accept the prompt to add the fingerprint to known hosts and boom, we should be logged in the machine:
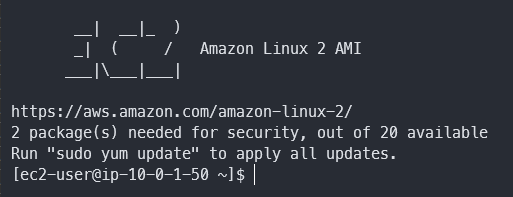
To exit we can just type exit , but now, we would like to see whether the user data has been correctly run. The logs can be found at:

And at the bottom we indeed should see the ‘echo’ message:

Alright, everything seems to work fine! We can now start to add some of the Terraform files to the .gitignore ! Let’s open it and add the following lines:

So that we will correctly excluding all the files that contains and may contain sensitive data.
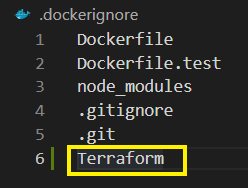
We also do not need the Terraform folder inside the Docker images. We’ll then add it to the .dockerignore :
We can now add and commit our changes and then push everything to Bitbucket (be sure to be in the simple-web-app folder):

And then:
git pushThis third part of the tutorial stops here! We implemented the foundations of our infrastructure and in the next step we are going to complete the infrastructure by adding the remaning resources which will be needed.
See you in the next part!
Cheers!
Kevin

Join FAUN: Website 💻|Podcast 🎙️|Twitter 🐦|Facebook 👥|Instagram 📷|Facebook Group 🗣️|Linkedin Group 💬| Slack 📱|Cloud Native News 📰|More.
If this post was helpful, please click the clap 👏 button below a few times to show your support for the author 👇